I know. I know. This is the second unhealthy food post I’m making today. Let’s face it, though. Sometimes we are going to treat ourselves (Or I am, anyway!). And my people do enjoy receiving candies and other treats at the holidays. So, until I learn to make the best-tasting healthy alternatives, this is what it is going to be.
Not worrying about the occasional unhealthy food experience is something I am working on, as long as I can keep it healthy most of the time. I am trying to not be to obsessive, which would be unhealthy in other ways.
Once all the candies have been collected, and the baked goods made, these treats need to be packaged festively to be given as gifts. These ideas will guide you along this path, but be as creative as you like. Switch things up. And share what you come up with in the comments below, or in a personal email to me at shannonlbuck@gmail.com. Pictures are welcome!
There are a number of ideas below, so keep scrolling until you reach something you would like to try.
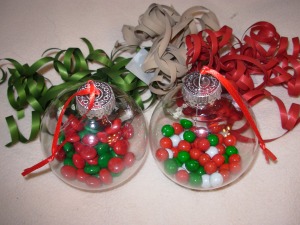 1. The directions for these ornaments are here. They are easy enough for children to make, and are a quick project when there is not a lot of time to spare.
For something a little different, add some curly ribbon to the inside of the bulb, along with the candy or gum.
Each ornament will cost about $2.00, but the price will go down the next year if the ornaments are reused.
2. These stockings are small ones. Filled minimally, they could be hung from branches on the tree. They  might be tacked to a wall or mantle when filled with heavier treats.
Simply place the candies into the stockings, and you are done. To get a little more decorative, write recipients names on the white, or attach a tag to the loop, and add some curly ribbon.
Stockings come in different colors, and some have felt shapes attached, such as bells, bulbs, or trees. It may be possible to find a different stocking for each child.
Look for stockings at a price of about .25 each, and fill with candies that do not cost a lot. To make 4 of these, it will cost around $3.00. What isn’t visible is the little chocolate balls that fill the toes of each stocking. That is .75 per gift.
These are the stockings I put together for 3 of my nieces, and 1 of my great-nephews. (He is not quite 1 yet, so only gets soft treats that he will not choke on.) Notice the gold coins, a throwback to my childhood. There are small candies and suckers in the stockings for my nieces. These go along with another gift I put together for each of them.
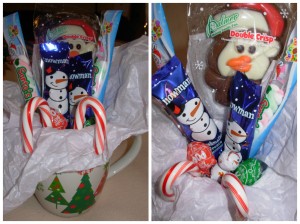 3. Mugs can be filled with candy and other items. Use an over-size mug for this, that can later be used for a big cup of hot cocoa or some tasty soup.
The article Easy Ways to Package Food Gifts on Bangor Easy Meals explains how to creatively wrap food gifts. Suggestion number 3 explains how to package candy bars, like in the photograph below.
Fill the mugs with candies for children or adults. The filled mug to the left was less than $4.00 to put together. The penguin was $1.00, the mug $2.50, and the tissue paper was reused from a gift received last year.
The one to the right cost just under $6.00. It is for an adult, and the candy bars are good quality chocolate and cost $3.00 for 3 bars. The tissue paper was not reused, but the gold bow came off the actual plastic package the bars came in. The curly ribbon came as a set of three for .99.
A couple of hot cocoa packets, some mini marshmallows, and chocolate dipped spoons would also make a great gift.
What would you fill mugs with for gift-giving? Tell us about it in the comments!
 4. Holiday tins filled with goodies are always a nice treat, whether the treats are homemade or not. Here are mini cupcakes, a good size chocolate Santa, a candy cane, truffles, and other small candies.
The tin was $3.50, but can be reused for years to come. The tissue paper was reused from a gift last year, and the ribbon and bow came already attached. The treats inside wouldn’t cost more than $3.00 if the cupcakes and frosting were homemade.
I put together one of these tins for a nephew. It cost about $8.00 to put together, but only because I bought him a box of quality peanut butter cups to go inside. He is older than the little ones, an adult, but he still likes the candies.
This is the most expensive gift I put together. I hope he likes everything!
How to Fill Tins for the Holidays, and What to Fill Them With is another article on Bangor Easy Meals that you will find interesting. It gives more ideas for filling tins, and not all of them have to do with sweets.
 5. Small holiday bowls can also be filled with goodies. Again, the tissue paper used in this example was reused from a previous years’ gift. The bowls were on clearance after Christmas last year, a 4-pack for .99. And the estimated total cost to make all four of these gifts is $3.00. That is .75 per gift.
Simply place tissue paper in each bowl, and fill with an assortment of candies. Simple.
6. And these little boxes are also easy to fill with different goodies. I made 3, but the package actually had 5 boxes for $2.50. The curly ribbon bunches came 3 to a package for .99. The total cost for the 3 presents was only about $3.00, because of the cost of the truffles. That is just $1.00 per gift.
The design on each box is simple and able to be used for either Yule or Christmas, a plus for gift-giving in my family.
What I actually made for my older nieces and nephews was slightly different, and are meant to go along with another gift they will each receive. So the cost about equaled out to what I spent to fill the tin for my other nephew. They cost about the same per gift as the example ones to make, and look nice.
 7. I fell in love with this box when I saw it at K-Mart, so I picked it up despite the $1.99 gift tag. It is adorable, and I will use it each year in my decorating efforts, so the cost is actually minimal.
Simply place a wad of tissue paper in the bottom of the box, and top with small candies. Cover, and add some curly ribbon. That is it!
Look for cute little boxes on clearance, and these could be thrown together for less than $2.00 per box.
8. This glass tree-shaped container was given to me for Christmas one year, filled with candies. The curly  ribbon cost .33, and the candies cost only a few dollars. So this was created for a little more than $3.00.
Fill the container with candies and cover, then stick a bundle of curly ribbon to the back, bringing a few strands to the front to tie loosely.
Butter mints or peppermints would work well in one of these jars, as would truffles.
 I am not giving away my tree container though. I like the container, and it goes nicely on my holiday shelf. Filled with simple candies, it sits on my shelf – and I give most of the candy away. The ribbon is not added.
Next year I might put hard butterscotch candies in it, or maybe other old-fashioned candies.
What homemade goodies might be placed in this or another differently shaped glass container?
9. Small gift bags, filled partially with reused tissue paper, are easily filled with candies or homemade  cookies, and given as gifts. The bag used in this example cost about .50, and the candies about $1.50. So, for $2.00 this gift bag holds a good size chocolate Santa, 2 candy canes, 2 suckers, two chocolate marshmallow snowmen, and a few little candies. Add curly ribbon for about .33, and a tag.
Not bad for the price, but it will likely cost less if the treats are homemade.
You may also enjoy:
Candy-Filled Ornaments and Tags
I hope these ideas are enough for you, and help you to make the holidays a little more special. There may not be more posts before the new year, though you never know. It depends how busy things get. So, just in case:
Blessed Yule, Merry Christmas, and Happy New Year.
And heartfelt blessing for any other holiday or sabbat you may celebrate.
I wish you all
Warm and safe holidays, and safe travels.
*Shannon*

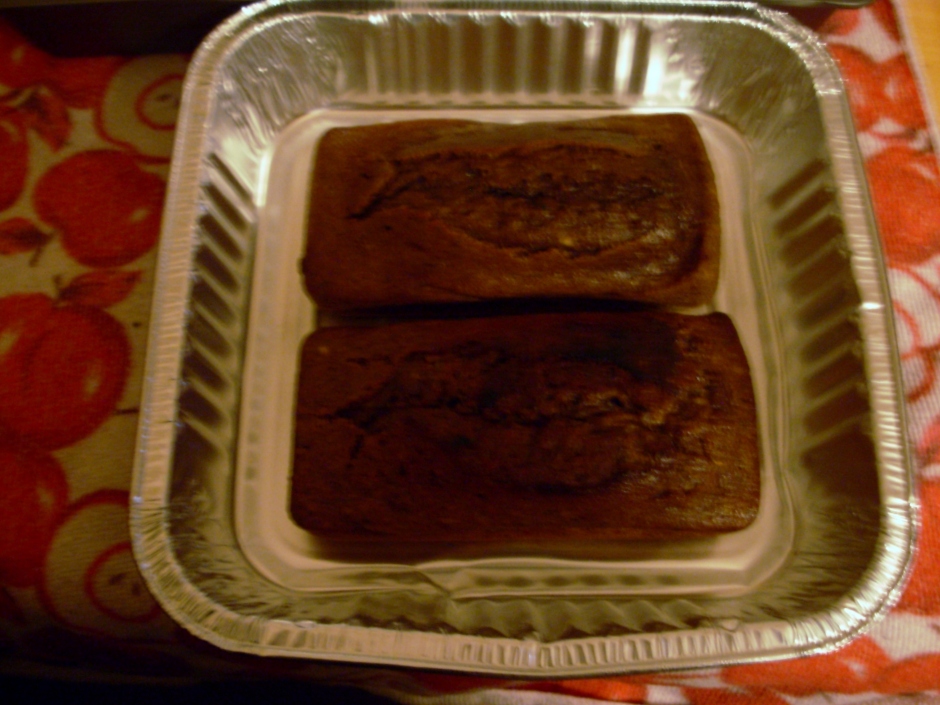


 Now, it takes time to do all of this, but it’s worth it. I planned an entire day at her place for this get-together. We did our grocery shopping first, and for lunch she made us rice and chicken. I also had apple slices. Dinner was bought on the run, at McD’s on the way home. Bad, I know! But quick.
 into the bunch. These items, for my part anyway, are usually purchased at discount prices or at thrift stores. Any way I can get them frugally! I don’t have much extra money at the holidays, so I look throughout the year for items that will help to make presents more fun to put together and give.
 The bestest and I do make quite the mess when baking, lol. Who doesn’t, right? And we maybe didn’t have all that we needed for utensils and such on this baking day because we had packed much of her kitchen stuff away in preparation for her move. We did have to improvise just a little, but it all worked out well.
 for the people I work with, plus gifts for each of three friends. I set up all four of the gift boxes I was going to need when I was ready to start filling them. The bestest did the same for her recipients. Plus, we both did gift boxes for friends we share.
 We had a great deal of fun during our baking day, listening to Pandora and chatting about all manner of things, including our blessings. And, toward the end of our day, we began packing all those delightful treats into their chosen boxes, bags, and tins.
 The hot cocoa did set me over my limit, but what a cute idea! There were eight boxes in the package, at $1.00 each. I couldn’t resist. Everyone likes a hot cocoa on a cold winter evening, and children enjoy some after hours of building snowmen and snow forts. Well worth the cost, in my opinion.
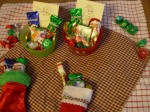 children will enjoy coloring them on a stormy day, when school is cancelled and they cannot be outside.
 treats, coloring cards, and a treat bag filled with small candies.
 and are large enough to also hold one of the cocoa boxes and a pencil.


